
![]()
Territory Manager
Getting started
Territories are displayed by city, publisher, type or worked date in the territory list box [1]. You can assign territories, display their boundaries and find territories by address.
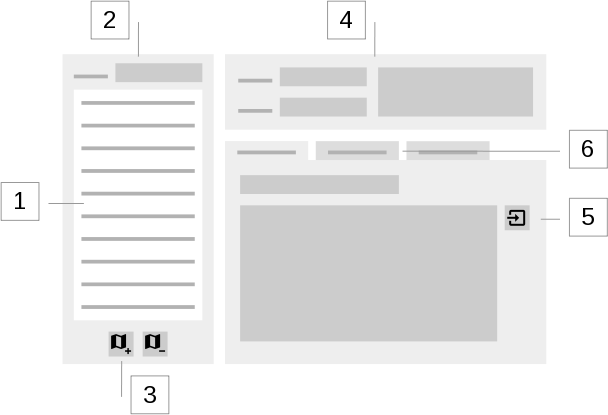
Take the following steps to start managing your territories:
- In the settings add the cities that belong to your congregation's territory and the types of territories and addresses you want to use.
- Add territories by clicking the
 button [3]. It is also possible to import territories through a KML-file and import addresses through a CSV-file [5].
 - Edit the territory attributes of the selected territory [4].
- Edit the territory assignments and addresses [6].
Edit territories
Add a territory
- Use the button to add a territory.
- Edit the territory attributes.
Edit territory attributes
- Select the territory in the territory list box or in the map.
- Enter the territory number in the No. field.
- In Locality type in the locality of the territory.
- Click in the City box and choose a city.
- Click in the Type box and choose a type.
- Place the cursor in the Remark field and start typing, if you want to add a remark.
Remove territory
- Select a territory in the territory list box.
- Click the
 button to remove the selected territory.
Territory assignments
Check out a territory
- Select the territory, that you want to assign to a publisher by clicking on it either in the map or in the territory list box.
- Click the
 button on the Assignments tab to add a new row in the assignments table.
Note: If the territory is already assigned to someone, the current day is set as Checked back in date, and the territory is assigned to the same publisher again with the following day as Checked out date. - Click on the Publisher field in the new row to open the drop-down list of publishers and select the publisher to whom the territory should be assigned to.
- Enter the date in the Checked Out field when the territory has been checked out.
Check back in
- Select the row of the publisher in the territory assignments list box to whom the territory has been assigned to.
- Enter the date in the Checked Back In field when the territory has been turned in.
Note: When dates for the assignments are entered, a validation takes place to check for instance if date ranges of different assignments overlap. Invalid date ranges are marked with a red box. If the input cannot be recognized as a valid date, the text color is red and cannot be saved.
Remove an assignment
- Select the row in the territory assignments list box that you want to remove.
- Click the
 button.
Find territories assigned to a certain publisher
- Select Publisher in the Group by box.
- The territory list box displays now the list of publishers who are assigned to a territory. Search for the name of the publisher and expand the corresponding node.
Find unassigned territories
- Select Publisher in the Group by box.
- Expand the Not assigned item.
Addresses
Add an address
- Select a territory.
- Click the
 button on the Addresses tab to add a new row in the addresses list box.
 - Enter the address components in the Add address dialog.
Note: The neccessary fields may vary from country to country.Tip: Try different approaches if no or a wrong address is found like entering or omitting fields such as Country or State.
- Click on the Search button.
- Select a row in the results list and click on the OK button.
- Click in the Name field of the new row in the addresses list box and enter a name.
- Click on the Type field and select the type of the address.
Import addresses
- Select the territory where you want to import the addresses.
- Click the
 button on the Map tab.
 - In the Import territory data dialog select the option Addresses.
- Click on the
 button next to the Filename field.
 - Select a CSV--file in the Open file dialog.
- In the Match Fields box choose the fields of the CSV-file that correspond to the Address and the Name.
Note: The first row of the CSV-file must contain the field names.
- Select an entry in the Address type field.
- In order to review addresses that could not be imported you can use the Output filename for failed addresses field.
- Click on the button next to this field.
- Chose a filename and click on the Save button.
- Click on the
- Click on the Import button.
Edit an address
- Select an address by either clicking on the marker in the map or a row in the addresses list box.
- Click the
 button on the Addresses tab to edit the location.
 - Edit the address components in the Edit address dialog.
- Click on the Search button.
- Select a row in the results list and click on the OK button.
- Click in the Name field and edit the name.
- Click on the Type field and select the type of the address.
Remove an address
- Select an address by either clicking on the marker in the map or a row in the addresses list box.
- Click the
 button on the Addresses tab to remove the address.
Zoom to an address
- Doubleclick an address in the addresses list box on the Addresses tab.
- Switch to the Map tab.
- The map is refreshed and displays the selected address in the center.
Territory Map
Import territory boundaries
- Click the button.
- In the Import territory data dialog select the option Territory boundaries.
- Click on the button.
- Select a KML-file in the Open file dialog.
- In the Match KML Fields box choose the fields that correspond to the Name and Description of a territory in the KML-file.
Note: Territories are searched by the assigned Name field. If no territory is found, a new territory will be created. If the Description field is assigned, the corresponding value will be saved.Caution: Assign the Name field only if it is distinctive.
- Use the option Search by "Description" if territory is not found by "Name" to include the Description field also in the search.
Caution: Use this option only if Description is distinctive.
- Click on the Import button.
Tip: You can use Google Maps to create a KML-file. Sign in and create a map. When you finish drawing the shape of a territory, enter the territory number in the Name field and the locality in the Description field. Finally you can save your map by clicking on the Export to KML menu item.
Remove a territory's boundary
- Select a territory in the map.
- Click the
 button.
Zoom to the full extent of the congregation's territory
- Press the
 button
 - The map is refreshed and displays the full extent of the congregation's territory.
Show/hide territories
- Press the Show/hide territories button. The display changes between the following modes:
 Show all territories
 Hide all territories
 Show selected territory only
 - The map is refreshed and displays the territories according to the current setting.
Show/hide markers
- Press the Show/hide markers button. The display changes between the following modes:
 Show all markers
 Hide all markers
 Show markers of the selected territory only
 - The map is refreshed and displays the markers according to the current setting.
Zoom to a territory
- Doubleclick a territory in the territory list box.
- The map is refreshed and displays the full extent of the selected territory.
Find territory by address
- Click on the search field.
- Type in the address.
- Hit the enter key. Markers show the search result in the map.
- Click on the map and select the territory.
By accepting you will be accessing a service provided by a third-party external to https://theocbase.net/
©
2006 - 2025
Theocbase Team